Wedding Ideas

  • Wedding Ideas
Showing posts with label Wedding Ideas. Show all posts

Tuesday, June 7, 2011

WEDDING IDEA!!!!!!!!

A nice centerpiece for a nice wedding and event!!! This is a very simple centerpiece and the avg cost per centerpiece would be $4.00!(I KNOW RIGHT CHEEEAPPP)


YOU WILL NEED.

1.a glass vase. any shape and size but I prefer A more oval shaped vase.

2. two different colors of thin ribbon. One of the colors should be a bit wider than the other:) I would suggest the same color as the flower that you choose for the wider ribbon:)

3. Pebbles- try and get the same color of pebbles as one of your ribbon.

4. A single full rose! artificial or real. I suggest artificial so it can last as long as you want!

5. water or no water. I like it both ways so its up to you:)


Directions:

*Take your rose and measure it from the bottom of the vase to the top. You want to cut the stem so its the perfect height that the rose sits right on the top of the vase. (Make sure the rose you pick is very full so it covers the whole top of the vase)

*Take your wide ribbon (the white ribbon) and wrap it around 3 inches from the top of the vase and make sure you have enough hanging so you have long ends after making a bow. 

*Don't make your bow yet, do the same with the thin ribbon( in my case the pink ribbon) and put it over the white that way you can see a little of both. Make sure the ends are long as well. 

*Now Tightly make your bow with both ribbons together.

*Adjust the bow to make it look pretty and cut the ends so that they are all even with eachother.

*Take the pebbles and carefully put them in the vase. (two handfuls)

*Put the flower in and make sure the stem goes in the middle with the pebbles around it.

*You can put water in it or not. your choice.

and VOILA!!!!
It's as simple as that!

Sunday, April 17, 2011

record player wedding invite

Wedding Idea.

So this isn't my idea. I found this idea on a wedding blog called 100 Layer Cake. its amazing!

This is a wedding invitation that comes with instructions on how to make their invitation into a record player that can play music. Its the neatest thing that I have seen!!

Here is the Link! In the link there is also a video. It shows how to they do it and how it works. so cool!!!!!
Record Player Wedding Invitation

Within 100 Layer Cake, they have ideas from themes, to vintage weddings(amazing), cake ideas, florals and much more! CHECK IT OUT!:)

That is all, Good night:)

Sunday, March 27, 2011

Wedding Idea Number Three

This is an art project that I did for a wedding in September.

This idea can be used for an outside wedding.
You can use one on each side of the signing table, altar, aisles. etc.


What You Need:
Bamboo teekee torch- Can be found at your local hardware store...canadian tire, home depot,etc

Ribbon- I would suggest using ribbon with wiring in it, that way the bow can stay up securely(In the picture the ribbon you see, is without wire in it) It Can be found at your local dollar store, or craft store

Flower arrangements- Real or artificial flowers. Pick two different types of flowers of your choice. They can be found at your local florist or craft store

Tie Straps- These will tightly hold your flowers in place. (They can be found in numerous colors. You need green ones so they blend in with the stems) These can be found at your local department store

Garden Sheers- You will need garden sheers to cut off the access stems that you won't need. (If you use real flowers, regular scissors will work fine. Artificial flowers will be too tough to cut with regular scissors)

DIRECTIONS:
1.Take your flowers and arrange them into a bouquet the way you want.

2.Take one tie strap and tighten it around the stems of the bouquet. Tie it 3inches below where the stems starts (by doing this step, it will keep your bouquet in place)

3.Grab your bamboo teekee torch, and get someone to hold it sturdy for you. Grab the bouquet and another tie strap and tightly put the tie strap around the bouquet and bamboo stick. (Use your own discretion on where you would like to place your bouquet on the torch)

4.Take your sheers/scissors and cut a bit of the stems off. (cut enough of the stems so that they don't stick out)

5.Take your ribbon and wrap it around the tie straps to hide them. I would suggest using a great amount of the ribbon because once you tie the bow, you want the ends to be fairly long for a pretty "flowy" effect.


NOTE:
To make sure the torch is secure in the ground, use a hammer, and lightly hammer it into the ground.(grass or dirt area is best)
If you are needing them on a paved area, I would suggest getting someone handy to make a stand to put them in or if you have axel stands, they work perfect!(that is what I used) Then cover the stand with fabric of your choice.(the same color of one of the flowers that are in your bouquet or plain white or black)

Tuesday, March 15, 2011

Wedding Idea Number TWO...a few days early:)

Sweet tooth anyone?!

If you don't, After reading this post and looking at these photos below you sure will!

Need to get a cake for a Birthday, Wedding, Anniversary, Any Event of your choice. Don`t look any further.

INTRODUCING

Made.With.Luv.Cakes


 Made With Luv Cakes is a business where Ashley Mckay and her team make cakes. Not just a slab of vanilla cake with some icing on top, she makes incredible designs, and themes, and things out of cake and fondant!

She does her business here in Thunder Bay, and She is amazing!

Not only does she do cakes, but she does cupcakes and pastries as well.

She does cakes and cupcakes for weddings, birthdays, events, fundraisers, YOU NAME IT!

I asked Ashley when after giving her a theme how you would go about finding the design of the cake.
She said " I usually give my opinion, send them photos or sketch my own design and send it to them. And then they can choose what they like the best, and pick out flavors and fillings from my website. After that a price can be established, depending on number of guests and technical difficulty of the cake."


Wanna know some of the flavors and fillings now?!?!
In no particular tasty order:
FlAvOrS:
Vanilla
Chocolate Brownie Fudge
Coconut
Strawberry Pink Princess (mmMmmm that sounds yummy and magical)
Bananarama
Oreo Cookie
Chocolate Chip
Pumpkin Pie
and moooooore

FiLlInGs:
Vanilla Buttercream
Vanilla Cream Cheese Frosting
Peanut Butter Frosting
Coconut Cream Frosting
Pink Cherry Buttercream
Chocolate Ganache
and Mooooore
NOTE: You can find more flavors and fillings from their website which will be posted at the end of this post!

Licking your lips yet!?! If not, don't fret yet. 
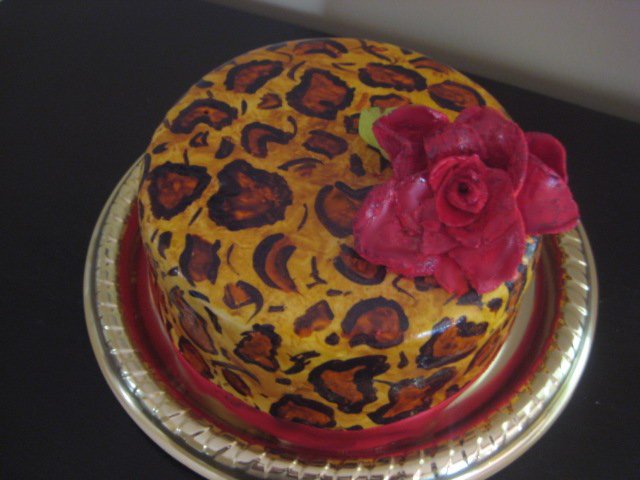
LOOK at these yummy and beautiful masterpieces!


 See the designs on the cakes that look like its been painted on? They have been hand painted with edible paint!


 The fondant that you see is Made. With. Luv's famous DELICIOUS Marshmallow Fondant. (Gives a smooth realistic effect on the cakes and figurines)


 The detail is amazing


This Cake is special to me:)
I got Made.With. Luv to make me this cake for my best friend's 21st birthday. It's Breakfast at Tiffany's themed. Everything was edible except for the film, ribbon, and broach.


 Disney Themed Cake?!?!?! UNREAL


 Saved By The Bell! Who doesn't like Saved by the Bell?!


 YUMMY! The cake is so realistic.


 Baby's Baptismal Cake. Beautiful!


It's CUPCAKE TIME!

Wanna see more?! Go to their website and or Facebook page!(scroll down for the links)


LOOKING FOR A HEALTHY ALTERNATIVE?!?! They also make Sugar and Gluten FREE cakes:)


 HOW MUCH do you ask?!?!
Well,
1 tiered cakes which serve 10-15 people start at $50.00 and up
2 tiered cakes which serve 20-30 people start at $100.00 and up
(includes hand sculpted sugar flowers or figures)
3 tiered cakes which serve 30-50 people start at $200.00 and up
(includes hand sculpted sugar flowers or figures.

Cupcake Prices are as follows:
Cupcake prices start from $1.50 & up
Fondant flowers cupcakes $2.75 & up
Cupcakes in clear case with ribbon $3.50 & up.(A cupcake that sits in a clear case with ribbon around it)

Contact Ashley Mckay from Made.With.Luv.Cakes by clicking on:


Ashley Mckay. Founder, and Owner of Made.With.Luv.Cakes

Friday, March 11, 2011

Wedding Idea Number ONE

For you all just checking in, every Friday I am going to Post a wedding idea. A wedding Idea that I have of my own, or a wedding idea that I have seen that I think is really neat. So here we go:)

Here is a center piece. I made this for a wedding in the summer.

NOTE: THIS DOESN'T HAVE TO BE JUST FOR A WEDDING. YOU COULD MAKE THIS FOR YOUR DINNER TABLE AT HOME OR COFFEE TABLE:)
You can use any colors, but with this theme the colors were green and black.

What you need:
A jar that is a decent size. You can find one at your local dollar store
Rocks/Pebbles You can find these at your local dollar store in little bundles. You can also go for a little walk and collect some that you find outside. Make sure you wash them well, and make sure they aren't too big.
Black Ribbon This ribbon can be found at your local craft store or department store.
Green Ribbon This ribbon can be found at your local craft store or department store as well.:)
Flower You can use a real flower or go to a craft store and buy an artificial flower.
Water
Glue Gun Find one at your local department store or craft store.

Directions:
1. Wash the jar and dry it well.
2. Measure your jar with the black ribbon and give it 2 cm of extra ribbon then cut it. Do the same thing with the green ribbon.
3. Use your hot glue gun and glue the black ribbon to the jar. put the glue only on the jar where the black ribbon starts. Now start rapping the ribbon tightly around the jar until it meets up with the other end of the ribbon. Take your glue gun and glue the other end to the jar.
4. Do the exact same thing with the green ribbon, except put it over the black ribbon.
5. Start adding your rocks into the jar
6. Pour water into your jar. Put enough water into it to touch the stem if you decide to use a real flower. If you are using an artificial flower, use enough water to cover the rocks,
7. Put the flower in. I would suggest a bigger flower that way it sits nicely on top of the jar.

And that is it! Hope you enjoy